
Sitecore Hub It’s gaining territory among clients, and more and more will start use this tool soon.
New technologies, will bring some additional changes to our application. So Let’s explore and little bit.
First
If you don’t have the connector installed on your local, It’s a good opportunity to install
Download the following connector version: https://sitecoredev.azureedge.net/~/media/7F118478CF78478087A1DB3EBDF9FBFE.ashx?date=20190626T140600
Download the following instructions document: https://sitecoredev.azureedge.net/~/media/7CDD5336845E43A983310AA4E2D24F2C.ashx?date=20210302T090834
Browse Buttons
You will notice that all the Image Field will show a new button called “Browse Sitecore DAM”, this will enable the possibility of selecting an image

Before explore the “Browse Sitecore DAM”, let’s understand how Sitecore is storing the value for this Photo
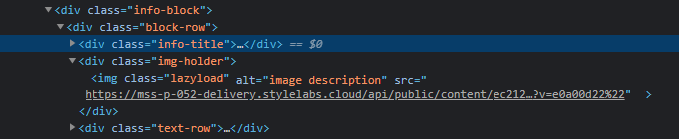
Switch to “Raw values” and you will see the following
<image mediaid="{8DFB5795-B0B8-4825-98E5-0DB8D6B24BD5}" />This tells us that Sitecore is Basically storing a reference to a Sitecore Item .
Authentication Step
Sitecore DAM requires authentication, it will ask for your credentials, so be ready to provide.
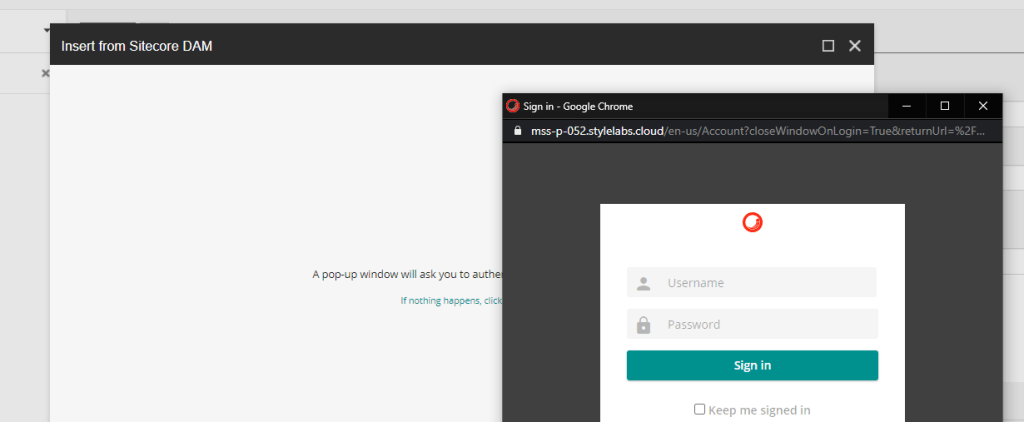
Now Let’s Select an image from Sitecore DAM, and after that, check the raw values again
Save the item and publish
<image alt="1639434665" mediaid="" stylelabs-content-id="100554" thumbnailsrc="https://mss-p-052.stylelabs.cloud/api/gateway/150354/thumbnail" src="https://mss-p-052-delivery.stylelabs.cloud/api/public/content/a605550148854ea39b23f6998c1c3fd4?v=cba2fe82" stylelabs-content-type="Image" height="160" width="124" />
Save the item
You can see that Sitecore DAM will store in a different way, and this will probably impact your application.
Now go to your webPage, and check if the image renders, Depending how the code is was written the image may not show up.
Using GlassMapper
If you have GlassMapper in your project, you can take advantage of this library
Ex The following implementation will rely on will use the “GlassMapper Image Field” in order to map the Field, and this is all that you need
using System;
using System.Collections.Generic;
using System.Linq;
using System.Web;
using Glass.Mapper.Sc.Fields;
namespace Feature.PageContent.Models
{
    public class HeaderModel
    {
        public Image Logo { get; set; }
    }
}
After mapping the object , you can simple extract the image URL using the follow command, Ex:
var imageUrl = headerItem.Logo.Src;You can also adapt your code to guarantee the compatibility with Media Library and also with Sitecore DAM, you can do this implementing checks and alternating between a simple “GetMediaUrl” and .Src provided by GlassMapper
Now check your Page and double check the image SRC, It should be loading the image from Sitecore Content Hub
In case you don’t have Glass installed on your solution, but still wanna take advantage of Content Hub
You can extract the string using Regex for instance
ImageField imgField = ((ImageField)item.Fields["photo"]);

var damImageUrl = Regex.Match(imgField.Value, "<img.+?src=[\"'](.+?)[\"'].+?>", RegexOptions.IgnoreCase).Groups[1].Value;
the end result will be the variable damImageUrl with the image path .
in this case I also would recommend to make this code compatible with a normal Sitecore Image Item, we would need to add a “if statement” checking MediaItem exist or not, and then , extract the Media Url using Media Manager ex : MediaManager.GetMediaUrl(imgField.MediaItem);
Good Luck!

You must be logged in to post a comment.